- Continue Shopping
- Your Cart is Empty
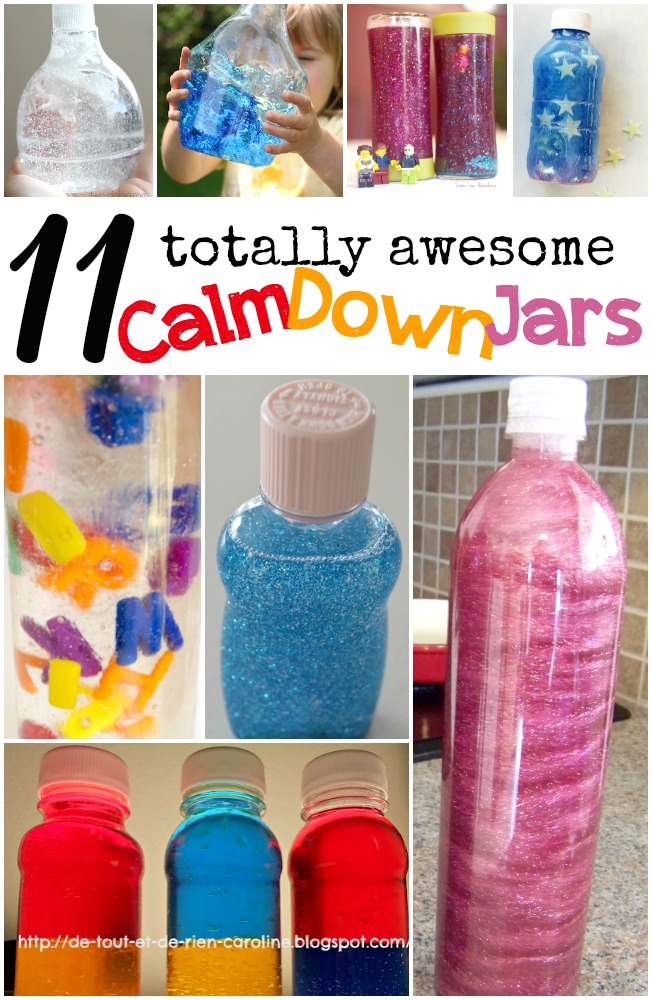
DIY Sensory Bottles

The calming effect of sensory bottles can do wonders for kiddos who become overstimulated or upset. And the best thing about this calm down tool is that you can use items in the home to make your own!
Start with a clean plastic bottle (thick, wide mouth Gatorade and Voss bottles work great). Place magnetic letters, foam shapes, blocks, ribbon, yarn, rubber bands, marbles, sequins, buttons, glitter and/or beads into the bottle. Fill the bottle with rice, flour, water, dish soap, corn syrup, baby oil, sand, shampoo, conditioner and/or hair gel. Secure the lid tightly to prevent a mess or choking hazard (you can seal it tight with a hot glue gun). And VOILA!
Before you get started, check out these 2 resources to explore different mixture ideas and discover ways to target important skills while using sensory bottles.
 The folks at Play Ideas provide some great sensory bottle ideas, along with links to the ingredients needed to make them. These will surely keep things interesting and keep your child learning! Read more ...
EarlyVention's Special Education and Autism Expert shares  advice on how to target important skills, from math to behavior development, while you and your child play with sensory bottles. Read more ...
Did your next subscription activity box just arrive? Not sure what to do with the old materials from the Sensory Exploration activity? Just throw them in a water bottle to create a whole new experience! :)
Turn-Taking Is Not An Important Skill...Said No Teacher Ever!
Teachers always talk about the importance of teaching turn-taking to children. Should so much importance be placed on this? Well, let’s think about some ways adults take turns throughout a typical day: conversing with one 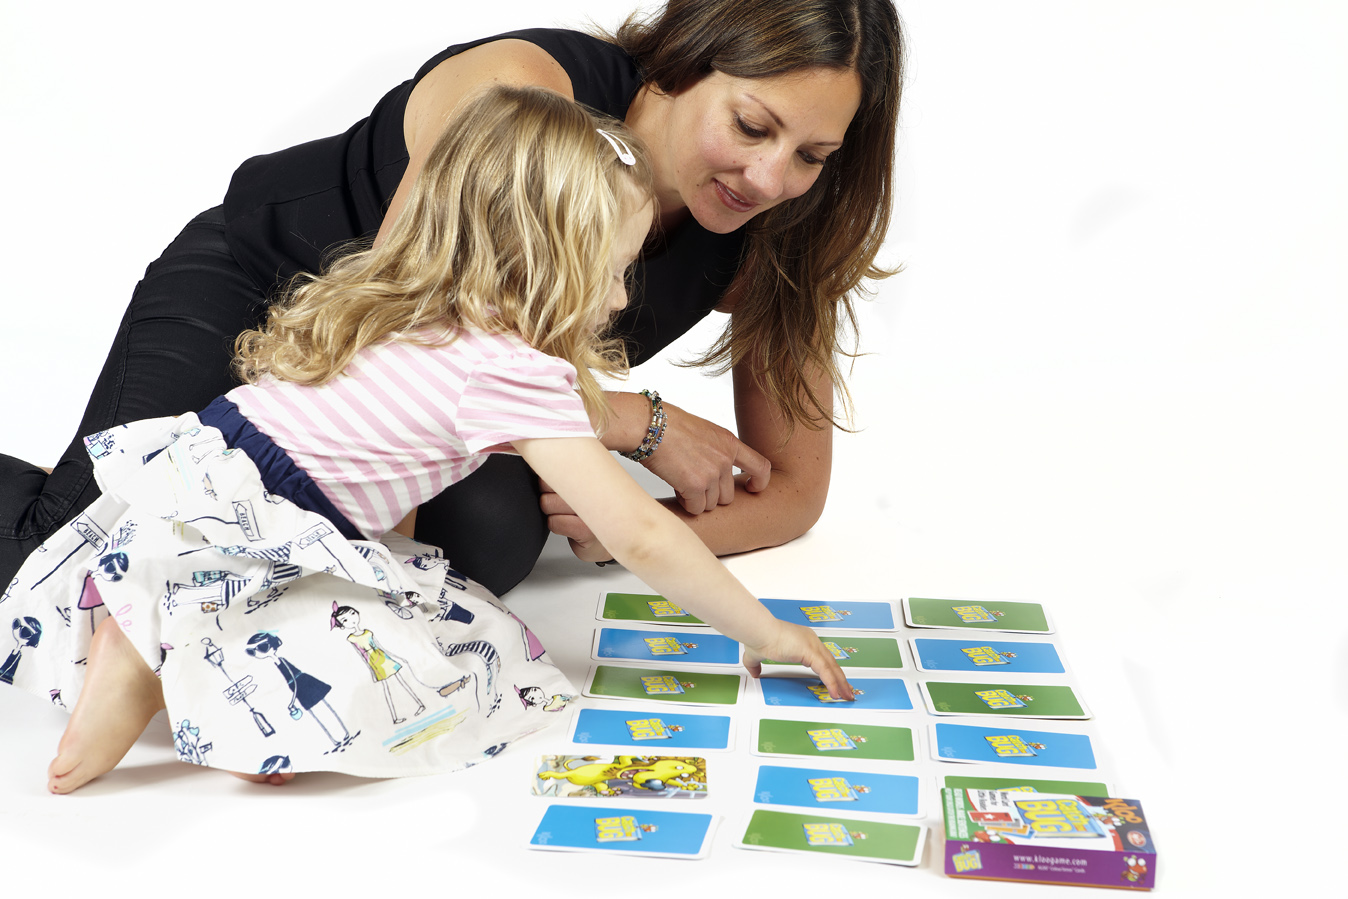 another, waiting in a grocery store line to check-out, finding a parking space…and the list goes on. As it turns out, learning how to take turns is very important, but don't children naturally learn this? Not really. Turn-taking is a skill that does not come natural to all children and needs to be formally taught. Try out some of these ideas to help your child learn this vital skill:
Start using the words “My Turn” and “Your Turn” during everyday activities.
Play simple cause and effect games or board games to promote turn-taking.
Use a timer to help visually prompt children when their turn is over or to help them understand how long they have to wait until it is their turn again. Use a metal brad and cut out an arrow to make a spinner. Attach them to a piece of paper and tape or Velcro a photo of the individuals who will take turns. Have your child move the arrow to show whose turn it is.
Write “It’s my turn” on a piece of paper or “My Turn” on a wooden block. The person whose turn it is holds the card or block while they take their turn. When that person’s turn is over, they hand it to the next person.
Write down on a piece of paper the names of each individual participating in an activity in the order that they will take turns. If your child needs extra support, allow them to clip a clothespin next to the person’s name who is taking his/her turn. Your child can keep moving it along as others take their turn. 
Add turn-taking into playtime. Take turns adding blocks to a tower or pushing a train around the tracks. Take turns playing a musical instrument or turning the pages in a book.
Take time to teach your child how to wait. Then, acknowledge and congratulate your child when he/she waits for a turn. Write “Wait” on a small square piece of paper to serve as a picture card to visually support your child during his/her waiting time.
Oh, Glorious Painter’s Tape!
 We all know that painter’s tape helps keep your paint lines clean and crisp, BUT did you know this little roll of goodness can help you provide visual supports?! Here are some great ideas on how to use painter’s tape to further support your kiddo:
- Make a square on the floor to show your child where to put on his/her shoes.
- Put a “Don’t Cross” line of tape on the ground to help keep kids safe and from wandering.
- Make an "X" with the tape to indicate where to stand while waiting.
- Outline a box to show where to place hands while waiting, or where to return toys after your child is done playing with them.
- Place a line on your bathroom wall to show how far to pull down the toilet paper before ripping.
- Add a strip of tape down the table to outline personal space boundaries between your child and others.

We'd love to hear from you! Call us at 312.880.9277 or email us at support@earlyvention.com to ask questions or share your thoughts about this post.
DIY Lap Weight Video
EarlyVention's quick tutorial shows how to make your own calming lap weight / lap pad for under $15! It's super easy and saves you 70% of the cost of animal lap pads currently on the market! Lap weights provide deep pressure, help improve body awareness and can help children regulate their own body and emotions. Make sure to include up to 10% of your child's body weight (e.g. 4 lbs for a 40 pound child) to create the most benefit!
For EarlyVention’s DIY Lap Weight, you will need:
- Sandwich size Ziploc bags (we used 6 bags)
- River pebbles (we used two 32 oz bags from the Dollar Tree to accommodate a child who weighs 40 pounds) or other type of stuffing (e.g. sand, beans, rice, lentils). Did you already fill the toy, but need to increase the weight? Consider adding fishing weights / sinkers!
- Duct tape
- Clean dish towel
- Calming essential oils (optional – we used Lavender)
- Ethical Pets Skineeez JUMBO Bite Dog Toy, 24 inch (various styles available through Amazon and Chewy).
There’s Much More to Pool Noodles! Who Knew?!
Pool noodles are cheap and have many more uses than just floating in the water. Here are some creative pool noodle hacks to help keep kids busy this summer.
1. Cut the pool noodles into 2-4 inch pieces, and have your child string the noodles together 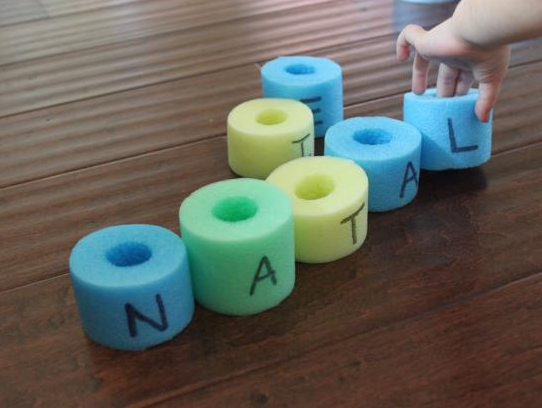 using a rope or stack them to build a tower. Work on creating patterns using 2 or 3 colors or different shaped pool noodle pieces. Write letters on the pieces and have your child
  arrange them to spell his/her name, sequence the alphabet or create sight words. Write numbers on the pieces to help with number identification and sequencing numbers. These are great ways to strengthen hand-eye coordination and build pre-math & literacy skills (e.g. letter/number identification, letter/number sequencing, name identification, patterning: AB, AAB, ABB, ABC).
 2. Have your child put rubber bands around the pool noodles or push corks into the middle of them. This activity will help strengthen your child’s hand muscles and improve their dexterity.
 3. Use pool noodles to bounce balloons around - we all know how much fun kids have with balloons, and this takes it to a whole new level! Put some noodles on the ground to use as a balance beam or add a sturdy board on top to create a balance board. Make a fun obstacle course by securing noodles into the ground using chopsticks or wooden dowels that kids can then crawl, jump or kick a ball through.
 4. Trim the bottom of a pool noodle so it can sit flat and add a slit on top to hold game cards, picture choices or step-by-step picture instructions.
5. Pool noodles can be used around the house, too! Use noodles as a door stopper or put them underneath a fitted sheet to keep children from rolling off the bed.

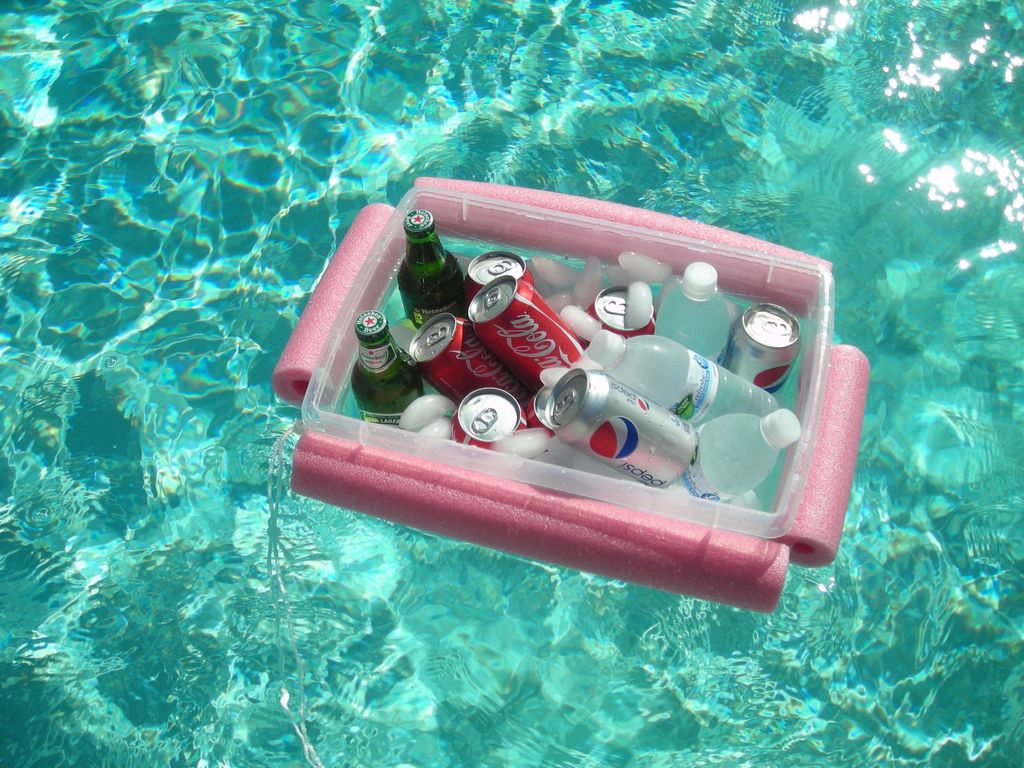
6. And our last hack is to help Mommy and Daddy enjoy summertime even more. String pieces of pool noodles around a plastic bin filled with ice and your favorite beverages and, voila...a floating cooler!
We'd love to hear from you! Email us at support@earlyvention.com to ask questions or share your thoughts about this post.
Thrifty Sensory Hacks: Instead of a Chair, Try These…
The idea of alternative seating is gaining popularity among therapy clinics, classrooms and even business offices. What is alternative seating? Simply put, it provides alternatives to the everyday chairs we use. It allows individuals to receive sensory input through gentle body movements, promotes proper posture, increases attending skills  and helps with understanding personal boundaries. Carpet squares, cube chairs, bean bags, bean bag chairs, pillows, peanut balls, ball chairs, wobble chairs, sit 'n' gyms and movin' sit cushions are some alternative seating options to check out. BUT, why spend the money when you can create your own alternative seating options?! Here are some of my favorite (and easy) sensory hacks to try.
Hack #1: Use a plastic milk crate and a child-size yoga ball. Don’t have a milk crate? Try a cardboard box. It won’t last as long, but will  temporarily prevent the ball from rolling away. Need something for a larger ball? Try a plastic party tub. Or, create your own ball base by using a pool noodle from the dollar store.
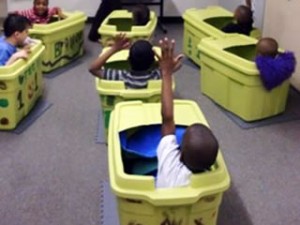 Some children like to sit in tight spaces. Provide that secure feeling for your child with these next two thrifty sensory hacks. Hack #2: Do you have an extra storage bin laying around your house? Cut ⅔ of the lid out. Apply duct tape around the part that was cut to assure there are no sharp edges. Then throw a small blanket or pillow inside.
 Hack #3: You’ll need a rectangular-shaped laundry basket, along with towels, blankets or pillows. Line the laundry basket with the soft materials you’ve collected while leaving space in the middle for your child to sit. Bonus: It’s quick and easy to recreate this seating option at others’ houses, if needed.
 Hack #4: Use a paint bucket to make a stool with built-in storage. Check out this tutorial with step-by-step directions. Children and students will likely take more ownership of their stools, and sitting on them, if they can decorate their own bucket.
 Hack #5: Let them stand! A very smart physical therapist once asked me if I sit or stand while cutting vegetables or putting on makeup (thanks for the insight, Norma Wall!). For some activities, our bodies are able to focus better and complete tasks with more ease by standing instead of sitting. So ask yourself, could my child or student better focus on the task at hand while standing? If so, let them stand!
We'd love to hear from you! Email us at support@earlyvention.com to ask questions or share your thoughts about this post.
Sensory Bottles...and Developmental Skills They Can Target!
Lots of children think sensory bottles (aka discovery bottles) are cool. We think the coolest thing about them is that you can make them yourself! There’s a ton of information on different ingredients you can include to create, for example, an I Spy bottle or a calming bottle. There’s far less information on what to actually do with these bottles after they’re made, aside from shaking and flipping them upside down. Here are some developmental skills to target while you and your child play with sensory bottles.
- Starts with the same beginning sound of a letter/word (e.g. say “I spy something that starts with the letter ‘T’” and then make the “t” sound),
- Ends with the same ending sound of a letter/word or
- Rhymes with the word you say.
Math Skills: Have your child identify different colors, shapes and sizes of items in the sensory bottle. Count different objects or talk about quantitative concepts (e.g. more, less, a lot and a few). Practice repetitive patterns by shaking the bottle two times and then stopping while chanting, “shake, shake, stop...shake, shake, stop.”
Social Skills: Take turns using the bottle. Make sure to give your child a warning on
how much time they will have to play with it until it is your turn. Say, “two minutes, then Daddy’s turn.” Then, use a sand timer to provide a visual representation of the two- minute time frame. When the time is up, point to the sand timer, say “it’s my turn” and gently take the bottle. Before you begin your turn, repeat the same process by saying, “two minutes, then Jacob’s turn” and flipping the sand timer over again. While you play with the bottle, your child is learning how to wait – a wonderful bonus skill for any child! When your turn is up, cue your child to express it is his/her turn. This can be done in many ways. You can:
- Prompt your child to touch his/her chest to signify ‘my turn” (one way to do this is to gently take his/her hand and pat his/her chest while you say “my turn” OR let your child pat his/her own chest while you say “my turn”),
- Verbally cue him/her to say “my turn” or
- Have him/her give you or point to a picture that represents “my turn.” A “my turn” picture is included in our picture support cards, along with a picture for “your turn,” “go” and “stop.”
Science Skills: Talk about which items sink to the bottom of the bottle and which ones float to the top. Describe any sounds the materials inside the bottle make. Let your child hold a magnifying glass to examine different items up close.
Sensory-Motor Skills: Encourage your child to roll the bottle on the floor and then
crawl, jump or animal walk (e.g. bear, duck or crab walk) after it. Add heavier items to the bottle, such as marbles, beans, corn, rocks or sand, to provide more weight. Allowing children with extra energy to carry around or hold a weighted bottle can help them both calm and organize their sensory system.
Behavior Development: Use the sensory bottle as a calm down jar. When your child is upset, have him/her shake the bottle and encourage him/her to take deep breaths while watching the contents swirl, slow down and eventually settle back to the bottom.
Want to learn more? Sign up for our newsletter to learn how to make a sensory bottle and discover a variety of ingredients and themes to keep it interesting.